Showing posts with label Recipes. Show all posts

Tuesday, September 25, 2012

Kurogoma Smoothie Recipe


Black sesame kurogoma smoothie or latte
Lately I've been craving those black sesame iced lattes from Dotour - so much so that I've even pledged to pick up some kurogoma marshmallows the next time I visit Chinatown or the Pacific Mall. (In case it wasn't obvious, I'm crazy about black sesame!) Well, I've tried the latte version a few times lately and I find that I drink it very quickly, so I decided it was time to try a smoothie recipe instead!

Did you know that black sesame is very nutritious, and supposedly can help you grow strong, glossy hair? It's also delicious - that's good enough for me!

Kurogoma Smoothie - 1 Serving


  • 1  1/4 cup milk
  • 1/2 frozen banana
  • 1 tsp black sesame paste 
  • 1 tbsp honey (omit this if your store-bought nerigoma contains sugar already)
  • 3-4 ice cubes

Mix the nerigoma with a little hot water to help it dissolve, then add it to the blender with the milk and banana. Add the ice cubes and then the honey last - adding the honey first will cause it to stick to the sides of blenders like mine (I actually use a mason jar blender), so it's better if you pour it over the ice and the banana to prevent that.

Blend on high and serve! Garnish with whip cream, black sesame seeds or kurogoma marshmallows, if you're feeling fancy! Omit the banana and add the ice cubes to the glass instead of blending them for a more latte-like experience.

For Toronto buyers, you can pick up Japanese nerigoma at J-Town or Sanko, and T&T sells a Korean-made black sesame paste made with brown sugar that I recommend. If all else fails, go the mortar-and-pestle route. Enjoy!

Friday, August 10, 2012

Melon Soda Recipe

Melon soda and cake in Japan
Drinking melon soda and feeding my expensive cake habit.

As you might have guessed, I have a penchant for cooking, and recreating food that I loved in Japan is usually my top target. One thing that I've managed to duplicate recently with some success has been melon soda. 

If you've lived in Japan for any amount of time, you understand the ubiquitousness of melon. It's a favourite flavour, and one I think might have even met with more success in the western world if it were properly marketed. Alas, it is not - the amount of hassle I had to go through to make a satisfactory melon soda (and it's far from perfect) from the materials I could find here is proof enough.

But surely, you might say, if this 'melon soda' thing is so popular, it's been imported? Actually, it has. A company called Sangaria markets their aluminum-bottle melon soda in the U.S. and Canada, including, occasionally, select grocery stores here in Toronto. I paid a hefty $5 USD each to buy these at North Market in Columbus, OH last year and came away extremely disappointed. You might recognize Sangaria as the producers of those cheap aluminum-bottle Ramune drinks in Japanese vending machines...and if you've ever drank one of these, you know they do not hold up to the real thing. The soda goes flat within 5-10 minutes, seems to warm abnormally quickly, and has a distinctive tinny taste. I haven't noticed the carbonation or taste issues with Fanta's aluminum bottles, so I can only conclude that it's something about the 'cheap' variety that Sangaria and other 100-yen soda makers provide.

As I've mentioned before, Coca-Cola has importing issues when it comes to their Japanese products, so it's unlikely we'll see Fanta Melon or Fanta Melon Cream over here at any point. So what's a girl to do when she has only sub-par melon soda to tide her over? Well...first, hit eBay, if you value authenticity as I do, and then when the prices scare you away, try your hand at making it yourself. 

As with Italian sodas and any fountain drink, you'll need to start with a concentrated syrup. This was tough, because the big-name brand that's easy to find in Canada, Torani, does not have a melon flavour - only watermelon. Apparently, Starbucks used to sell under their label and use a Torani 'melon' syrup in their matcha drinks (...what?) but it's now discontinued and the only Torani type I can find is watermelon. You're definitely going to need a cantalope or rock melon flavour!

In the end I settled on a Monin syrup because I could net a 1-litre bottle from Amazon for less than $15. The colour is not right - melon syrup is supposed to be green - but the taste is close. I also picked up some kakigoori melon flavouring; that is, the concentrate that is used to flavour shaved ice. If you have access to this from a local Asian grocery, it's a great idea.

"Cream" soda - melon soda
with vanilla soft serve
That's enough rambling - on to the proportions!

Homemade Melon Soda - 1 Serving

  • 500 ml club soda/soda water
  • 2 tbsp melon syrup
  • 5-6 ice cubes
  • Muddler (chopstick or a long spoon will do)
  • A few drops of green food colouring (optional)
Pour the soda water into your glass and add the syrup, stirring gently to mix well. You can add a few drops of food colouring (2 is often enough) to get the authentic colour. Add ice until your glass is full. 

For a cocktail look, add the syrup first and do not stir until serving - this recipe can be used with melon liqueur as well. Prefer melon cream soda to the original? Just add a scoop of vanilla ice cream, and enjoy!

Monday, July 23, 2012

CoCo Ichiban Curry Recipe

My favourite combo - curry topped with cheese
and a crab cream croquette.
Ever since I returned from Japan, I've been striving to perfect a curry recipe that lives up to CoCo Ichiban, a famous chain restaurant with locations all over the country.

If you're not familiar with Japanese curry, the first thing I need to point out is that it's very different from Indian curry. The flavour was introduced to Japan by the British in the 1800s, and continued evolving to suit the Japanese palette. The standard Japanese-style curry is a thick sauce created from curry powder and usually flavoured with pork or beef, and served over short-grain Japonica rice. Onions, potatoes and carrots are often used in homemade Japanese curry, but you can add whatever you like, or keep it smooth, restaurant-style. 

Curry rice is usually considered a comfort food, and it is so popular (especially with children) that it's offered at many restaurants and cafes. None, however, take it to the level that CoCo Ichiban does. They are a curry-only restaurant that offers scaling levels of heat and a myriad of toppings for your dish; things that you may not have ever considered adding to curry rice. Chopped tomato, spinach, asparagus, fried quail eggs...if they think it'll sell as a savoury topping, you'll find it at CoCo Ichiban.

CoCo Ichiban serves a liquidy curry with a yellowish tint, and it's my understanding that the broth is pork-based. Even the lowest spice levels have a kick to them! I found that it was not as sweet as some other curries I'd tried, and I really liked that it was served so basic, without the onion-potato-carrot combination, unless requested.

While I'd made and enjoyed curry before, I found myself craving CoCo Ichiban specifically - something about their curry was just fantastic. When I stayed overnight in Shibuya over winter break one year, I've find myself emerging from my capsule at 7 A.M. and starving. CoCo Ichiban for breakfast? Yes ma'am! A half-plate of cheese curry with a mango lassi to drink set me back just ¥400. Four hundred yen! Seriously! I suspect it was these early-morning curry runs that got me hook, line and sinker - usually I'm so queasy in the mornings that there are only a small handful of foods that I can safely eat. Curry is definitely the strangest.

After coming home to Canada, I started experimenting with various recipes to recreate the CoCo Ichiban taste. As you might guess, this was a tough prospect - a Google search turned up plenty of people, mostly Americans stationed in Okinawa, who had tried and offered their recipes, but none were quite right. The following is the closest I've been able to get:

CoCo Ichiban Cheese Curry - A Work In Progress
  • 4 servings cooked Japonica rice
  • 3 strips of bacon, chopped
  • 1/2 box or 1 small* package S&B Golden curry sauce mix (medium-hot)
  • 2 1/2 cups water (reserve an additional 1/2 cup water for the end of the cooking process)
  • 2 tbsp brown sugar
  • 2 cups shredded Monterey, cheddar or mozzarella cheese
  • salt, pepper and crushed red chili peppers or cayenne pepper (optional)
  • 1 thinly sliced onion (optional - tasty, but CoCo's curry is smooth and onion-free)
  • Any other toppings you like - why not check out CoCo Ichiban's bilingual menu for ideas?

In a pot or frying pan, cook the bacon through, and sauté the onion, if using.

Add water and bring to a boil, then remove from heat and stir in the curry sauce mix. You can use other brands of curry sauce if your selection is limited, though S&B Golden is the closest to the real thing. You can also experiment by using 1/2 a package of one brand and 1/2 a package of the other. This post on Serious Eats is a great primer! Nowadays, I almost always do a blend of Kokumaro and Golden.

*Note that many stores in the U.S. and Canada carry smaller packs of curry roux - the net weight of these is in the 125 gram/4.4 oz range. In Japan, you will get two "blocks" of roux per 240-gram box. Please check your box to make sure you have the correct amount! If you want to use a large box or two small boxes of different brands, remember to double the amount of water, bacon and sugar written above.

Let the curry simmer for about 5-10 minutes. (Use this time to prepare your toppings! Another favourite of mine is tonkatsu!)

How's the consistency? CoCo's curry isn't as thick as most homemade curries tend to be. Thin it out with the reserved water if you need to. (If you've thinned it too much, add a tablespoon of corn starch dissolved in cold water.) Finally, add the brown sugar and stir it in. If you've added onions, but you still want that smooth CoCo Ichiban texture, strain out the onions with a sieve.

Warm your plates in the microwave - this is really important, or the curry will cool down too fast and congeal! Then dish out the rice, top with 1/2 cup shredded cheese and 3/4 cup or so of the sauce. Sprinkle on a bit of salt, pepper and chili peppers/cayenne pepper to taste.

Eat! Enjoy!

Tuesday, June 26, 2012

Melon Pan


There used to be a truck that came by each Friday and parked by our local train station, offering dozens of varieties of my favourite baked treat - melon pan. This combination of cookie + bread was created in the image of a rock melon, and ever so occasionally even have a melon taste! Melon pan are pretty old hat, but the Beikudo truck - which makes its rounds along various cities in northeast Osaka - was really something special. They would have the bread warming in the ovens in there, for one thing, and the selection was amazing.

My friend S and I routinely picked up half a dozen or more from Beikudo to bring home for the weekend - it was our "TGIF" ritual.

Melon Pan courtesy of the Beikudo website
I would die for one of these right now

I had never seen anything quite like Beikudo. The bakery nearest my home station stocked a fairly boring lineup of plain melon pan, and a chocolate-chip variety. Occasionally they'd have a "theme" month where you might be lucky enough to get something like cocoa, but mostly, it was just the regular fare. Beikudo, however, had some flavours that were incredibly off the beaten path. I could be here all day listing them - sadly, they don't feature a full list on their website. Here are a few I can remember, including a couple of favourites: 

Plain
Black tea
Green tea
Caramel
Chocolate
Chocolate cookie
Chocolate cream cookie
Chocolate orange
Melon cream
Strawberry
Coconut
Pumpkin
Apple & Spinach

If it was seasonal, there would be a melon pan flavour for it. How I miss Beikudo!


Melon pan via Beikudo
Three "specialty" flavours: Spinach & Apple, Pumpkin, and Coconut

Now that I'm home, melon pan is very tough to find in Toronto. I've never seen any variety except plain, and they also dry out so fast that if you arrive at J-Town's Nakamura Bakery by day's end (if there are even any left), they aren't half as good. Melon pan are meant to be soft, and while I sometimes kept my Beikudo purchases to last through the weekend - and even mailed a boxful packed in Tupperware to a friend in Canada! - I find Nakamura's have reached their life by the next morning. Very unfortunate.

If you're interested in trying to make your own (and I fear this might be me tonight), you can find a recipe over here at Japan Chan!

Sunday, June 24, 2012

Rice Cooker Cake Recipe


Making cake in a rice cooker
So many sugar cravings


As I've mentioned before on the blog, I've been trying to cut down on my sugar intake, with varying degrees of success - it's tough when you have a sweet tooth like mine. Recently, I thought I'd try my hand at baking something myself so that I could control the amount of sugar going into it.

I settled on a cocoa honey cake from the blog What Julia Ate. Reading about her experience with the recipe, I was much relieved to find that plenty of people out there are trying to stick to natural sugars. She recommended her cake with a little bit of maple syrup on top. This wasn't the tough part, of course, as there are plenty of recipes out there for weight watchers and diabetics. 

My Zojirushi NS-TGC10.
Five and a half cups is
the perfect size!
The problem, I realized (long after I'd gotten gung-ho about the idea of having real cake very soon) was that since moving to Toronto, I haven't actually baked. Therefore, I don't own a real cake pan - and the last of the tinfoil pans I bought on moving in, I ended up using not that long ago for some squares. Ah... 

But wait! Then I remembered the mysterious Cake button on my rice cooker. I'd picked out the Zojirushi NS-TGC10 mostly because it was very similar to the one Emily owned (and I had therefore borrowed after mine broke) in Japan. I had had to make a final choice between a cooker that had a 'tofu' setting and this one, which had the 'cake option.' 

It actually was a tough choice for me. But functionally, I was much more likely to make an occasional cake and continue buying fabulous Korean-made fresh tofu at P.A.T. Spring Market. The Zojirushi was what I ended up taking home - and even though you can buy fuzzy logic (i.e. fancy) rice cookers in most major cities, I heavily recommend using Amazon for a serious rice cooker purchase. The selection is fantastic - providing the seller ships to your area, of course - and the prices for the really nice rice cookers are much lower than I was finding them locally.

Back to my dilemma - I had seen rice cooker cake in action, back in Japan, while visiting a co-worker's house. My cooker had even come with a recipe for cake, though I had no idea where that might have gotten to. Still, if it could make one cake, it could probably make many variations of basic cakes, right?

I started mixing up the ingredients (shame I couldn't have mixed it right in the rice cooker bowl, but that needed to be greased) and dumped in the rather thick batter. I figured, if Julia's came out perfect, so would mine. Maybe.

Then I set the rice cooker to 'Cake', and pressed the 'Cooking' button.

45 minutes or so later (seriously? faster than making rice?) the cooker started singing a little tune, and I eagerly opened up the cover to see the fruits of my labour.
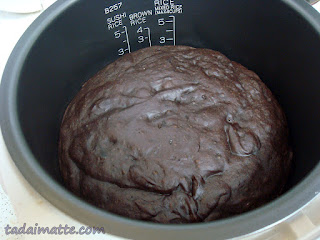
Rice cooker cake
Not sure if want

Hmm. Well, that wasn't quite what I imagined.

Still, I hate wasting food, and a fair amount of honey had gone into this experiment, so I took it off the heat and let it cool down a bit on the bottom, then I turned it out onto the steamer accessory that came with my sukiyaki pot. (No cooling racks, obviously. Someone buy me a real kitchen.)

Making cake in a rice cooker
But now it doesn't look half-bad!
Then I left it to cool a little longer, but the promise of warm cake in the next room made that extremely difficult, needless to say. It was hardly twenty minutes before I was back and cutting myself a slice to top with a spoonful of maple syrup. 

The verdict?

It was actually very good!

The cocoa was subtle and the honey gave it juuuust enough sweetness. It was fluffy and soft, though it was a little on the dry side - I assume this is a result of some combination of a recipe not really intended for fuzzy logic cooking, and left-the-rice-cooker-on-'Keep Warm'-for-a-few-minutes-by-accident. Next time, I will add an extra egg (included in the recipe below) to try and account for that.

What do you think? Want to give cooking in your rice cooker a try? I actually own a very good rice cooker cookbook, though I'm always looking for new recipes. If you have anything, send it my way! 


Rice Cooker Honey Cocoa Cake
adapted from What Julia Ate

  • 1 cup all-purpose flour
  • 1/2 teaspoon baking soda
  • 1/2 teaspoon baking powder
  • 1/4 salt
  • 1/4 cup cocoa powder
Mix dry ingredients thoroughly, using a sifter if necessary.

  • 1/3 cup oil (any vegetable oil you like; warmed coconut oil is great!)
  • 1/4 cup honey
  • 1/2 cup buttermilk or yoghurt
  • 2 eggs
  • 1 tablespoon vanilla extract
  • optional: 1-2 tbsp applesauce
Combine the wet ingredients and add them to the dry, and mix well. Grease the inside of your rice cooker pan and add the batter, then set the rice cooker to the 'Cake' setting. (Not sure I would risk it in a cooker than doesn't do cake, but if anyone tries this, do let me know....)

When your cooker starts singing to you, you know it's time!

Remove the pan from the heat immediately and leave to cool for a few minutes before turning out onto cooling racks. When it's cool enough to eat, top with fruit, maple syrup, whip cream or whatever suits your fancy!

Wednesday, June 6, 2012

Taiyou no Tomato Ramen Recipe

I developed an affinity for a particular ramen shop in Shinjuku; a type that is quite difficult to find elsewhere - tomato ramen.


Taiyou no Tomato's cheese ramen
Tomato Cheese Ramen

You may have heard of tomato nabe, but ramen is a much rarer thing.

The restaurant in question is called Taiyou no Tomato Men (Men meaning 'noodles'), and it's located on the food court floor of the Mylord building in Shinjuku, part of Shinjuku Station. After just one taste I knew I had to recreate this at home, lest I leave Tokyo and never be able to eat it again. Well, as it turned out, it's a small chain and they have an Osaka location - in fact, a huge number of shops have opened since then! - but I still returned to Shinjuku with my friend Gen-chan to get her help in figuring out the ingredients (and also to hook another person on Taiyou no Tomato, natch).

Between the two of us and the Taiyou website for some ingredient tips, we came up with the following easy recipe that you can use to make your own tomato ramen at home!

Taiyou no Tomato Ramen
Serves 4 
Ingredients
4 portions fresh/frozen ramen noodles (cooked, 3-5 minutes)
(please avoid freeze-dried 'Mr. Noodle'-types here; if you must use pantry noodles, use Chinese chow mein noodles or angel hair pasta)
1 tsp olive oil
1 large (28 oz) can crushed tomatoes or tomato sauce*
2 cloves garlic
Handful of baby spinach leaves or mizuna, if available
3 cups chicken stock*
2 chicken thighs, cubed or sliced
1 celery stalk or small amount of bok choy (if desired)**

1 tsp basil
1 tbsp onion powder/dried onion

Toppings
8 tbsp fresh grated parmesan (if no fresh is available, substitute shredded mozzarella cheese - you want it to melt)
chili oil, to taste
red pepper flakes, to taste (optional)**
salt & pepper, to taste (optional)**
Directions
Sautee garlic, tomatoes and spinach in olive oil. Add the stock, chicken and greens, then seasonings, and simmer for 20 minutes. If you prefer your soup a little thinner, add more chicken stock or water.
Cook the noodles in a separate pot and serve into 4 bowls. Add soup, then cheese on top and allow cheese to melt into the soup. Eat with chopsticks and a ramen spoon if available.


If there are leftovers, you can use the soup stock, cheese and some bread crumbs over rice in a buttered dish, and bake it for a delicious rice casserole!

This recipe was adapted from a tomato nabe recipe to closely resemble Taiyo no Tomato’s Tomato Cheese Ramen dish. Marked differences are:
*Taiyo Tomato broth uses a stock made of a pork/chicken/salt mixture
*Taiyo uses tomato sauce rather than diced tomatoes
*Taiyo does not use the ingredients marked by double asterisks
*The website cites 小松菜 (mizuna) but the leafy vegetable at the restaurant appeared to be spinach

Taiyou no Tomato Men's tomato ramen
Taiyou no Tomato menu selection

Taiyou's Cheese Ramen Official Ingredient List:
原材料: ナチュラルチーズ (natural cheese), 鶏もも肉 (chicken thigh), 小松菜 (mizuna)
【国産】  :無農薬サラダ油 (organic salad oil), にんにく (garlic), バジル (basil), 塩タレ (salt dripping?), 鶏のパイタンスープ (chicken ‘paitan soup’), トマトソース (tomato sauce), チャーシューのタレ (char-siu [roast pork] drippings), 豆乳麺 (soy noodles)

Eggplant Variation (remove basil, cheese and mizuna):
なす (eggplant, sliced), 江戸菜 (edona - Japanese mustard spinach) 根深ねぎ (green onion, finely chopped)

Egg Variation (remove basil & cheese)
鶏卵 (raw egg, scrambled and stirred into the soup at the very end), 江戸菜 (edona), 黒こしょう (black pepper)


The restaurant also sells a make-at-home version of their dish, Eggplant & Vegetable Ramen. It includes some extra ingredients you may want to try with the recipe above. Translation is mine, so if you have any corrections, please leave a comment:

Sautee garlic, eggplant, green pepper and zucchini in olive oil, add a dash of salt & pepper. Add the soup broth and bring to a boil, then simmer 10 minutes before adding noodles and chopped scallions.太陽のなす野菜麺
    オリーブオイルでにんじん、なす、ピーマン、ズッキーニを炒め、塩・コショウで少々。十分に火が通ったら、スープの素とお湯を加える。ひと煮立ちさせたら、ゆでた麺と合わせ、きざんだ長ネギを添えてできあがり!

Taiyou no Tomato Ramen


Wednesday, May 16, 2012

Dangojiru Recipe

Dangojiru noodle soup from Kyushu
Lunch at Ichinoide Kaikan in Beppu, Oita

I tried several times to make Dangojiru, the tasty soup from Kyushu, on my own. (It's not exactly easy to find outside of Kyushu!) I based my recipes from a combination of recipes I found online, and what I ate myself in Beppu. Resources used were from Tess' Japanese KitchenOitaNet and The Asian Grandmothers Cookbook, all of which had solid-looking recipes, but none were QUITE like the fabulous meal I had at Ichinoide Kaikan. I prefer a very simple soup, similar to the one pictured above, so give it a try!

Dashi (start this first):

  • 4x6 piece of kombu
  • 4 dried shiitake mushrooms
  • 4 1/2 cups water

Put all into a medium sized pot and let them soak for at least 2 hours (or refrigerate up to a day).
 
Noodles:

  • 1 cup all-purpose flour
  • pinch of salt
  • ~1/3 cup water

Put the flour and salt large bowl. Make a well in the center and add several tablespoons of the water. Stir with a fork or chopsticks. When the water is mostly gone, add a little more water and stir more.

Repeat until the flour looks like coarse sand or even like gravel.

Press the mixture into a ball. Knead on a floured surface for about 5 minutes, until the dough is the consistency you feel when you pinch your earlobe. ;) Cover it with a damp napkin and let it rest for at least 30 minutes.

Flatten the ball of dough and cut it into strips, about 3/4 inch wide. Gently stretch each piece and lay it down, then go back to the first piece and stretch again; this time each noodle will be a little longer. When you place a newly stretched noodle down, you’ll notice it will shrink a bit.

After about 2 rounds of stretching and the noodles are shrinking a lot (they should be about a millimetre thick), cover the noodles with a damp napkin and let them rest for 10 to 15 minutes. Put them on a dry towel on a rack, cover them with a dry towel, and proceeded with the rest of the cooking.

Dashi (again):
Over medium heat, bring the dashi almost to a boil and cook for 5 minutes, maintaining a bare simmer. (Don't boil, or it will become cloudy.) Let it stand off the heat for 5 minutes, then remove the kombu & mushrooms, and strain through a cloth.

Vegetables:

  • Daikon (cut each round into 6 pieces)
  • Small handful of nappa cabbage, taken from the bottom of the cabbage and cut into 1-2 inch squares
  • Mushrooms (shiitake, enoki, etc)
  • Sliced leek
  • Carrots (cut into flowers)
  • 100 g miso
  • Chopped green onion, for garnish
  • Slice lemon, for garnish
 
Add vegetables to the soup and cook for a minute or two on medium. Then drop the noodles into the soup, one by one, and cook to desired consistency. 3-5 minutes is a good place to start checking on them.

You can use whatever veggies you like - various recipes recommended sweet potatoes, bok choy, cabbage, tofu, aburage, potatoes, onion, spinach, green beans, taro, choy sum, etc.

Serve! The noodles do not keep well for leftovers, so if you think you have made too much, freeze the extra dough without cooking it. You can always add more noodles to your soup (4 noodles per person seems like a wise amount!), but it's much harder to remove them once it's done and you want to store away the leftovers. For extra caution, you can cook the noodles in a separate pot with some standard dashi powder and serve that way.

Credit for the original recipes I used to narrow this one down are via Tess' Japanese Kitchen, OitaNet and The Asian Grandmothers Cookbook.